Husqvarna Chainsaw Diagram Parts: My Simple Repair Guide
I remember staring at my workbench, surrounded by tiny springs, dirty screws, and a half-taken-apart 455 Rancher. I thought fixing a simple oil leak would take ten minutes. But without the right Husqvarna chainsaw diagram parts list to guide me, I was completely lost. It felt like trying to solve a puzzle blindfolded while hoping I did not ruin a very expensive machine.
Eventually, I learned that understanding these exploded views is the secret to keeping any saw running forever. In this guide, I will share exactly how I read these diagrams, find the right replacement pieces, and avoid the frustrating mistakes I made when I first started repairing my own equipment.
Why You Need a Husqvarna Chainsaw Diagram Parts List
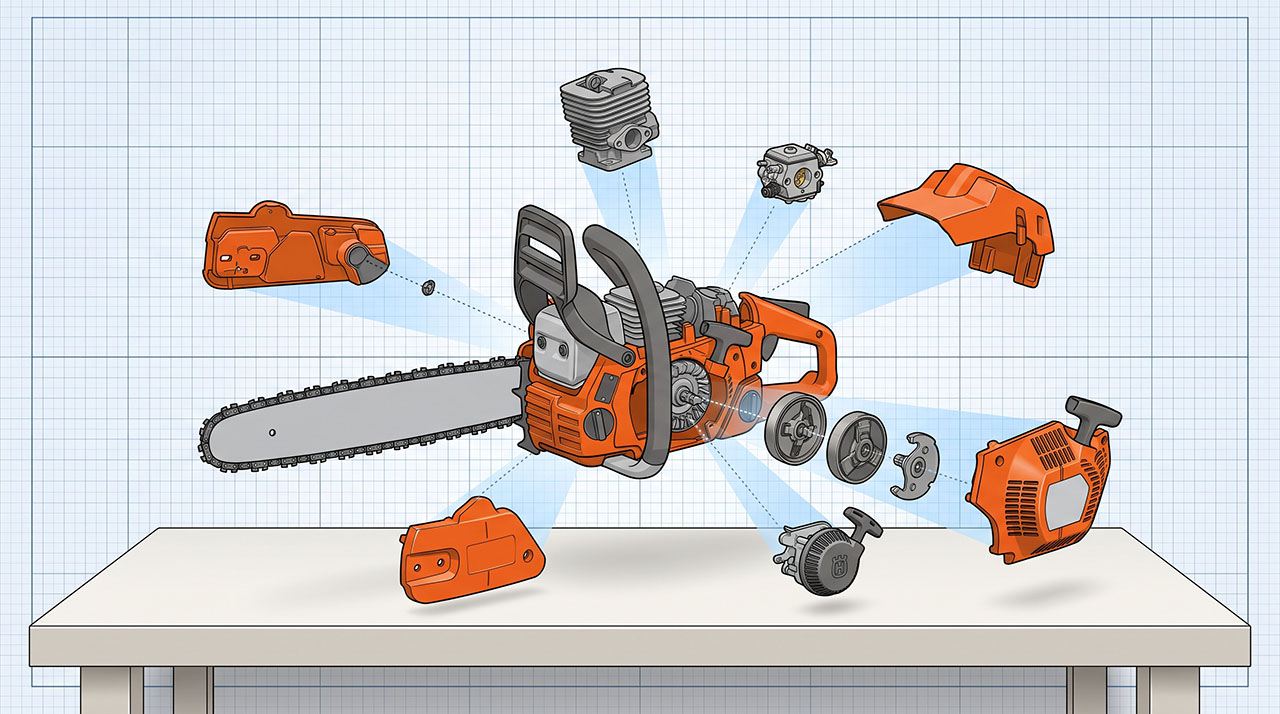
A diagram is not just a simple picture. It is the map to your entire machine. It shows you exactly how every washer, bolt, and rubber gasket fits together inside the saw.
Making Sense of the Exploded View
When you first look at an exploded view, it looks chaotic. Parts are flying everywhere in a messy 3D web. It overwhelmed me the first time I saw one.
But once you realize it just shows the exact order of assembly, it clicks. I learned to look at the center of the image first. That usually shows the main body of the saw. From there, I follow the dotted lines outward to see which order the smaller pieces attach.
Catching Hidden Washers and Clips
The biggest reason I rely on a diagram is to spot the invisible parts. When you pull a clutch apart, a tiny metal clip might pop off and roll under your workbench. If you do not have the diagram, you will never even know it was missing.
I always check the drawing to see if a bolt requires a specific washer. Skipping one tiny spacer can cause your whole chainsaw to vibrate apart while you are cutting.
How to Find the Exact Part Numbers You Need
Looking at a picture is only half the battle. You need the actual numbers to order anything online. Husqvarna assigns a specific numerical code to every single piece they make.
Locating the Serial Number and Model
I used to just guess my model year based on when I bought it. That was a costly mistake. Husqvarna updates their saws often, even if the model name stays exactly the same.
You have to find the little metal tag or sticker on the crankcase. It tells you the exact year and week your saw was built. Always match your diagram to that exact build date to ensure you get the right fit.
OEM vs. Aftermarket Parts
Once you have your numbers, you have to choose between buying original equipment manufacturer (OEM) items or cheaper aftermarket copies. I have tried both over the years.
Sometimes saving money makes sense, but other times it ruins your saw. I prefer OEM for anything inside the engine, but aftermarket is fine for basic plastic covers.
| Comparison Point | OEM Parts | Aftermarket Parts |
| Fit and Finish | Perfect fit, matches diagram exactly | Often requires slight modification |
| Durability | Built for heavy, long-term use | Materials may wear out faster |
| Price | More expensive | Very budget-friendly |
Breaking Down the Main Chainsaw Sections
Most manuals divide the saw into a few main categories. This makes it much easier to digest the information. You do not need to look at the engine page if you are just fixing a broken trigger.
The Powerhead and Engine Components
This section covers the cylinder, piston, and crankcase. It is the beating heart of your saw. If you are digging into this page of the diagram, you are likely dealing with a major rebuild.
I always pay close attention to the base gaskets in this section. If you put the wrong gasket under the cylinder, your saw will pull in too much air and burn up.
| Engine Issue | Likely Culprit | Diagram Category |
| Loss of compression | Worn piston rings | Cylinder / Engine |
| Air leak at the base | Blown base gasket | Crankcase |
| Sputtering at high speed | Bad spark plug | Ignition System |
The Fuel System and Carburetor
Fuel lines crack over time, and carburetors get clogged with old gas. This is the diagram page I visit the most frequently.
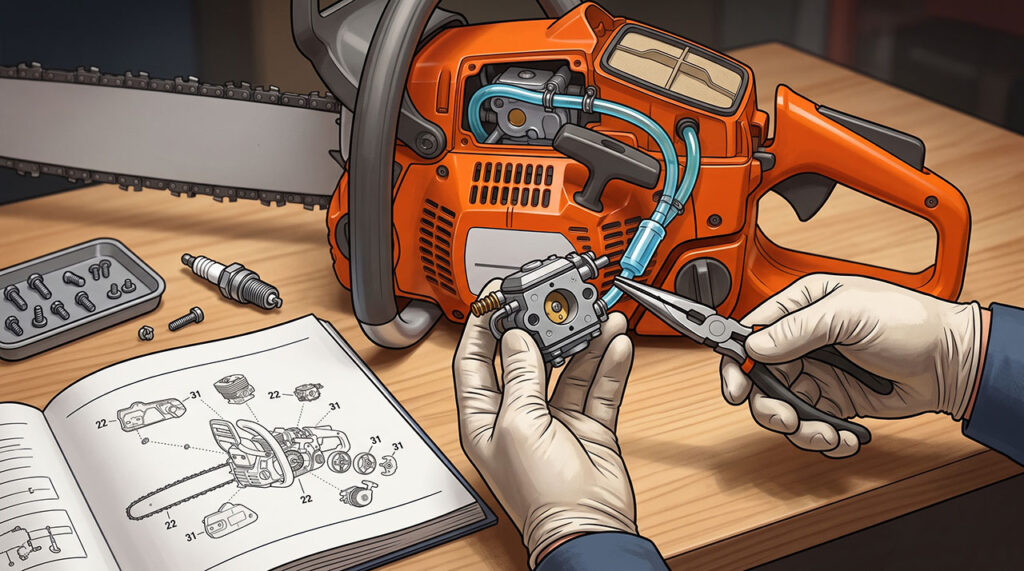
Pay close attention to the routing of the fuel lines in the picture. I once routed a fuel return line backward because I did not look closely at the drawing. The saw would start, but it would die as soon as I pulled the throttle.
The Cutting Gear (Bar, Chain, and Sprocket)
This section includes the guide bar, the chain, the sprocket, and the clutch assembly. These parts wear out the fastest because they do all the hard work against the wood.
When you look at this part of the manual, check the part numbers for the rim sprocket. Changing just the rim is much cheaper than buying a whole new clutch drum.
| Cutting Gear Wear | Recommended Action |
| Chain slips off bar | Check diagram for worn bar plates |
| Sprocket has deep grooves | Replace sprocket and needle bearing |
| Clutch engages at idle | Check diagram for broken clutch springs |
Common Mistakes When Ordering Parts
Learning to read these manuals came with a lot of trial and error. I wasted money and time by rushing the process. Here are the traps I learned to avoid.
Ignoring the Tiny Hardware
It is easy to order a big part like a new cylinder and forget the gasket that goes under it. Diagrams always show these small items right next to the big ones for a reason.
I now order new clips, washers, and gaskets every time I replace a main component. Reusing old, stretched-out springs is a guaranteed way to break your saw again next week.
Best 12-Inch Battery Chainsaw: Top Models for 2026
Trusting Universal Fits
Many websites sell universal parts that claim to fit multiple brands. Do not fall for it. A chainsaw vibrates at insanely high speeds. A part that “almost” fits will eventually vibrate loose.
Always cross-reference your specific Husqvarna chainsaw diagram parts list. If the number does not match exactly, do not buy it. It is not worth the risk.
| Common Mistake | Better Approach |
| Guessing the part name | Use the exact 7-digit Husqvarna part number |
| Buying universal fuel lines | Buy the pre-bent OEM lines shown in the diagram |
| Reusing old gaskets | Order fresh gaskets with your new parts |
My Process for Teardown and Reassembly
Taking a saw apart is incredibly easy. Putting it back together is the real test of your patience. Having the schematic printed out next to me is my best trick.
Organizing Tiny Screws and Springs
I used to throw every screw into a single old coffee can. When it was time to reassemble the saw, I spent hours guessing which screw went into which hole.
Now, I use a cheap plastic tackle box. I label each compartment with the reference number straight from the diagram. It saves me massive headaches later.
Using the Diagram as a Roadmap
During reassembly, I read the exploded view backward. If part 12 goes on before part 13 in the picture, I follow that strictly.
If you skip a step, you usually have to take the whole thing apart again. I once forgot a simple chain catcher plate. I had to remove the entire clutch assembly just to put it back on.
| Reassembly Issue | Troubleshooting Step |
| Extra screws left over | Review the diagram step-by-step from the start |
| Parts do not sit flush | Check diagram for a missing spacer or washer |
| Throttle feels sticky | Verify linkage routing against the schematic |
Essential Tools for Chainsaw Repair
You cannot just rely on a good schematic. You also need the right tools to actually remove and replace the components safely without breaking anything.
Beyond the Basic Screwdriver
Husqvarna uses Torx screws heavily across all their models. A good set of T-handle Torx wrenches is absolutely mandatory.
I also learned the hard way that a piston stop tool is essential when removing a clutch. Trying to use a metal screwdriver to stop the piston from moving will just scratch the metal and ruin your engine.
| Tool | Primary Use | Why It Matters |
| T-Handle Torx Set | Removing body panels and covers | Prevents stripping out the screw heads |
| Piston Stop Tool | Locking the engine block | Allows safe removal of the clutch |
| Feeler Gauge | Setting the ignition coil gap | Ensures the saw gets a strong spark |
Cleaning Before You Build
Before I even look at the diagram, I grab a can of compressed air and some degreaser. I clean the entire saw thoroughly.
If dirt falls into the crankcase while you are taking it apart, your engine will chew itself to pieces. A clean workspace makes reading the diagram and handling small parts ten times easier.
Safety Checks After Assembly
Once every part is back in place according to the diagram, the job is still not done. You have to test the saw safely before you take it to a tree.
Testing the Chain Brake
The chain brake is your most important safety feature. After I reassemble the saw, I start it up, let it idle, and push the brake handle forward.
The chain should stop instantly. If it hesitates, I turn off the saw and pull the diagram back out. Usually, I installed the brake spring slightly off-center.
Tuning the Carburetor
If you replaced any fuel system parts, the saw will likely run a little rough at first. You will need to adjust the carburetor screws.
Always start rich and slowly tune it leaner. If you do not know how to tune a saw by ear, take it to a professional. A saw that runs too lean will run very hot and melt the piston you just spent hours replacing.
Fixing your own equipment is incredibly rewarding. Once you learn how to properly read a Husqvarna chainsaw diagram parts list, you stop feeling intimidated by sudden breakdowns in the woods. You realize that a chainsaw is not magic; it is just a collection of simple pieces bolted together in a specific order.
Take your time, match your serial numbers carefully, and keep your workspace clean. The first repair might take you a few hours, but soon you will be swapping out carburetors and clutches like a pro. Keep those printed diagrams handy on your workbench, take pictures with your phone as you work, and stay safe out there cutting.