How to Measure a Chainsaw Chain: My Practical Guide
I remember my first time standing in the hardware store aisle, staring blindly at a massive wall of replacement chains. I genuinely thought I just needed to buy an “18-inch chain” for my saw. I grabbed a box, drove all the way home, and quickly realized the new chain did not fit my chainsaw at all.
Learning how to measure a chainsaw chain is a real rite of passage for anyone who cuts firewood or manages a yard. It seems very confusing at first. You see strange terms like pitch, gauge, and drive links. But once you do it once, it suddenly makes perfect sense. I want to save you the exact headache I went through. Here is my practical, no-nonsense method for finding the exact chain you need without guessing.
Why “Bar Length” Fails You Every Time
The biggest mistake I made early on was trusting the length of the bar alone. You might own a saw with a 16-inch or 20-inch bar. That number just tells you the cutting length of the equipment. It does not tell you the physical size of the chain loop itself.
Two totally different chainsaws with 18-inch bars might require completely different chains. One saw might use a thicker chain. Another might have cutter teeth that are spaced closer together. If you just buy any 18-inch chain off the shelf, you will probably waste your time and money.
| Common Assumption | The Real Truth |
| Any 16-inch chain fits a 16-inch bar. | Chains have different thicknesses and link counts. |
| The brand name matters most. | The specific chain measurements matter most. |
| You can guess the size by looking at it. | You must measure or read the exact specs. |
The Three Magic Numbers You Must Know
When you want to learn how to measure a chainsaw chain, you really only need to look for three specific details. These are the pitch, the gauge, and the drive link count.
If you get these three numbers right, your new chain will fit perfectly every single time. Let me break down exactly what they mean and how I find them in my garage.
| Chainsaw Spec | What It Actually Means |
| Pitch | The distance between the drive links. |
| Gauge | The thickness of the metal drive links. |
| Drive Links | The total number of links around the chain loop. |
Finding the Pitch (The Distance Between Rivets)
The pitch tells you the overall size and spacing of the chain. It is technically the distance between any three rivets in a row, divided by two.
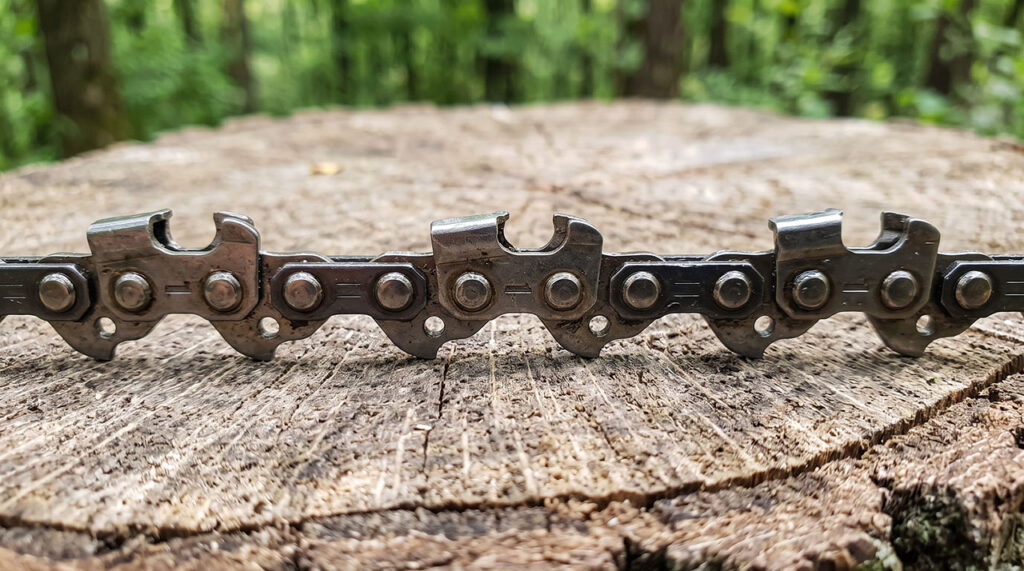
You can measure this with a tape measure, but it is hard because the rivets are tiny. Common pitches are 3/8 inch or .325 inch. Honestly, I rarely measure this by hand anymore. I just look for the stamped numbers on the side of my guide bar, which saves a ton of time.
Finding the Gauge (The Thickness of the Drive Link)
The gauge tells you how thick the small metal fins on the bottom of your chain are. These bottom fins are called drive links. They slide inside the narrow groove of your chainsaw guide bar.
If you buy a chain with a gauge that is too thick, it will completely jam in the bar. If you buy one that is too thin, it will wobble. A wobbling chain is scary and dangerous. It can easily slip off the bar while you are cutting through thick wood.
Counting the Drive Links (My Foolproof Method)
This is the most critical step of the whole process. The drive link count dictates the exact length of the chain loop. You absolutely cannot guess this number. You have to physically count the links.
I always take the old chain off the saw and lay it flat on my workbench. I take a black Sharpie and color the very first drive link. Then, I carefully count every single link around the loop until I reach the black mark again. It gets oil on your hands, but it is the only way to be completely sure. Common link counts are 55, 68, or 72 links.
How to Find the Specs Without Measuring By Hand
You might be reading this and thinking it sounds like a lot of tedious work. The great news is that you rarely have to measure tiny metal parts manually.
The chainsaw manufacturer usually prints a cheat sheet right on the tool itself. I wasted an hour trying to measure rivets before an older neighbor showed me where to look.
Checking the Guide Bar for Stamped Numbers
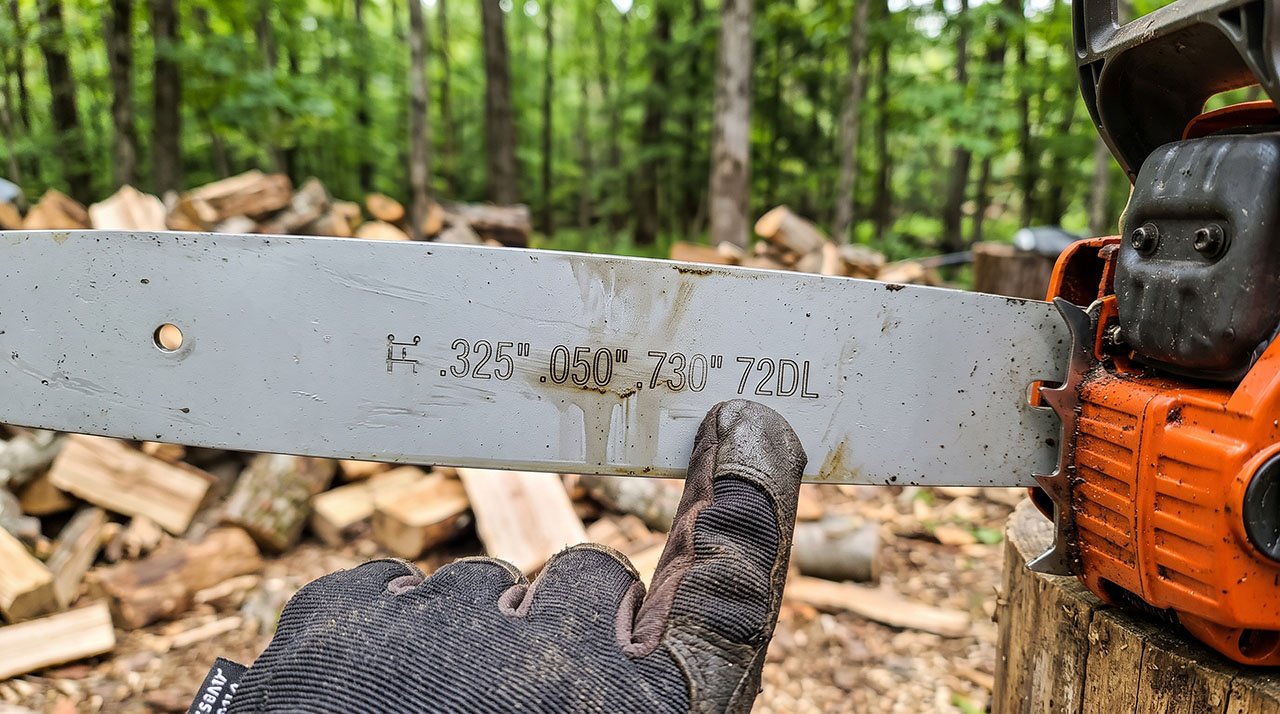
Look closely at the flat, bottom side of your metal guide bar. Check the area right near the base, where the bar connects to the plastic engine block of the saw.
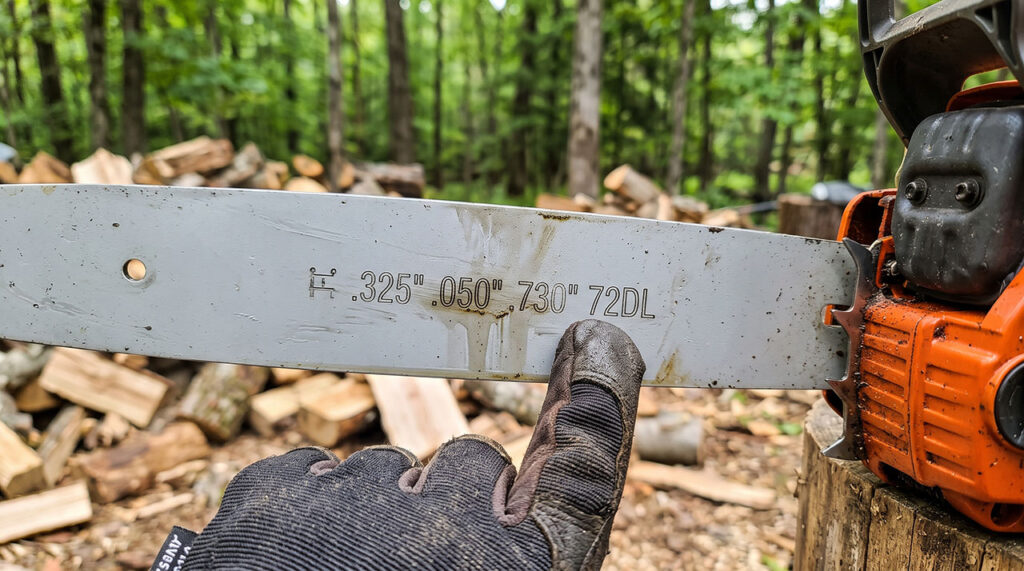
You will almost always find the pitch, gauge, and drive link count stamped lightly into the metal. Over time, sticky tree sap and dark bar oil cover these numbers up. I usually spray a rag with some brake cleaner or WD-40 and wipe that area vigorously. Once the grime is gone, the numbers usually appear clear as day.
| What You See on the Bar | What It Means for You |
| 3/8 | Your chain pitch is 3/8 inch. |
| .050 | Your chain gauge is .050 inches thick. |
| 72 DL | Your chain needs exactly 72 drive links. |
Using the Coin Trick to Find Your Gauge
Sometimes those helpful bar numbers are totally worn off from years of sliding through dirty wood. If that happens, finding the exact gauge is very annoying. You normally need a digital caliper to measure it. I do not keep calipers in my shed.
An old arborist taught me a brilliant coin trick. It is the best hack I have ever learned for chain maintenance. You just need a clean quarter, a penny, and a dime from your pocket to figure out the gauge size.
| Coin Used | Matching Gauge Size |
| Quarter fits snug | .063 gauge |
| Penny fits snug | .058 gauge |
| Dime fits snug | .050 gauge |
First, clean the empty groove of your guide bar with a flathead screwdriver. Then, slide a coin into the groove. If the quarter fits perfectly without wiggling side to side, your gauge is .063. If the penny fits, it is .058. If only the dime slides in, you have a .050 gauge. It is remarkably accurate every time.
STIHL AP300S Battery Best Price
Mistakes I Made When Buying a Replacement Chain
I want to share a few times I really messed this up. Figuring out how to measure a chainsaw chain involved some frustrating trial and error on my part.
I hope reading about my blunders helps you avoid these silly mistakes the next time you visit the hardware store.
Guessing the Drive Link Count
Once, I counted the oily links very quickly and thought I counted exactly 72. I bought a 72-link chain at the store. I got home, put it on the saw, and it was just a tiny bit too loose. I could not turn the tension screw enough to take out the dangerous slack.
I went back to the bench and recounted my old, dirty chain. It was actually 70 links. Always mark the first link with a pen and count twice. A loose chain will derail while spinning at high speed, which can seriously hurt you.
| Hardware Store Mistake | My Better Approach Now |
| Guessing the link count from memory. | Writing the link count in my phone notes. |
| Assuming a brand name fits all models. | Matching the exact pitch and gauge numbers. |
| Buying based on bar length alone. | Buying based on the drive link count. |
Mixing Up Brands and Compatibility
Another time, I thought I could put a Stihl brand chain on my older Husqvarna saw just because the overall length looked identical. It turns out the gauge thickness was completely different.
Brands love to use very specific specs for their tools. You do not always have to buy an expensive name-brand chain. A cheaper aftermarket chain works perfectly fine. However, you absolutely must match the pitch, gauge, and links exactly, no matter whose name is on the box.
Reading the Codes on Your Old Chain
If your guide bar is too worn out to read and you do not want to use the coin trick, just look at the old chain itself. Most decent chains have numbers stamped directly into the metal links.
These numbers are unique brand codes. They do not clearly say “.050” or “3/8”. They are usually simple double digits. You have to look up what those specific digits mean to decode your chain.
Oregon Brand Codes
If you run an Oregon chain, look closely at the side of the drive link. You might see a small number like 72, 73, or 20 stamped on it. A stamped 72 means it is a 3/8 pitch and a .050 gauge.
It is incredibly helpful to know this. I usually take a photo of the tiny number with my phone and zoom in on the screen. My eyes are just not good enough to read tiny metal stamps in dim garage lighting anymore.
Stihl Brand Codes
Stihl chains are a little bit different. They usually feature one number on the drive link and a completely different number stamped on the cutting tooth.
For example, a ‘3’ on the drive link means a 3/8 pitch. A ‘6’ on the drive link means a .063 gauge. Once you learn how to decode these small numbers, buying the right replacement feels incredibly easy.
When to Just Replace the Guide Bar and Chain Together
Sometimes, knowing exactly how to measure a chainsaw chain is still not enough to solve your cutting problems. The chain might not be the only part holding you back. The metal guide bar wears out too.
If you put a brand new, tight chain on an old, sloppy guide bar, you will ruin the new chain very fast. I learned this painful lesson when I lived on a wooded lot and cut oak firewood every single weekend.
Checking for Bar Wear
Take your brand new chain and set it down inside the guide bar groove. Take your fingers and try to gently wiggle the chain side to side. If the chain leans over heavily, the inside rails of your guide bar are worn out.
The chain should always stand straight up. If it flops to the side, even the coin trick will not work properly because the groove has stretched too wide from years of friction.
| Old Chain Condition | Next Step to Take |
| Chain stands straight in the groove. | Just buy a new replacement chain. |
| Chain flops side to side in the bar. | Buy a new guide bar and chain combo. |
| Drive links are severely chewed up. | Check the drive sprocket for damage. |
The Value of Combo Packs
If I notice my guide bar is worn out, I skip all the measuring steps entirely. I just buy a brand new guide bar and chain combo pack from the store.
It usually costs a bit more up front, but it completely saves me the headache of measuring. Plus, the saw instantly cuts like it is brand new again. Replacing the bar and chain together is easily the best money you can spend on routine chainsaw maintenance.
Final Thoughts
Learning how to measure a chainsaw chain only takes a few minutes, but it will save you hours of driving back and forth to the store. You simply need to find the pitch, the gauge, and the drive link count. Whether you read the dirty numbers on the bar, use the clever coin trick, or slowly count the links by hand, you now have the exact knowledge to get it right on the first try.
My absolute best advice is to write your saw’s three magic numbers in your phone or on a piece of bright tape stuck right to the saw’s plastic case. You will never have to guess in the hardware store aisle again. Keep your saw clean, keep your chain sharp, and stay safe out there cutting.